
→ ConoHa VPS 1GプランのUnixBench を実施して計測し、さくらのVPS、お名前.com VPS(KVM)と比較してみました。
に記載しています。興味のある方は、そちらを参照してみてください。
以前の記事「評判のお名前.com VPS(KVM)を使うときに最初にやっておきたいこと(CentOS編)」で お名前.com VPS ( KVM ) で同じように、初期状態から、最初にやっておきたいことを記事にしました。
さくらのVPSでは、「評判のさくらのVPSを使うときに最初にやっておきたいこと(CentOS編)」で同じように記事にしました。
今回は、ConoHa VPS において、デフォルトOSであるCentOS 6 をインストールした状態(初期状態)から やっておきたいことを整理しておきます。
- 目次
- 履歴
2013.7.31 初版
ConoHa VPS を使う前にやるべきこと
ConoHa VPS の場合、アカウント登録を行っただけでは、VPSは動きません。
コントロールパネルから VPS追加 をしてはじめて、CentOSがインストールされます。
ConoHa VPS では、これを「VPSを作成する」という表現しているように、VPSを動かすためには、まず、VPSを作成します。
ConoHa のコントロールパネルへログインした以降について、VPSの作成方法を簡単に解説します。
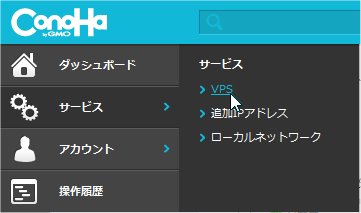
- コントロールパネルの左バーの [ サービス ] – [ VPS ] をクリックします。
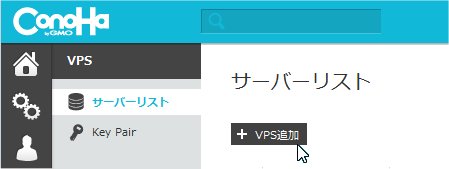
- VPS追加 をクリックします。
- 追加するVPSのプランを選択し、rootのパスワードを入力し、確認 をクリックします。
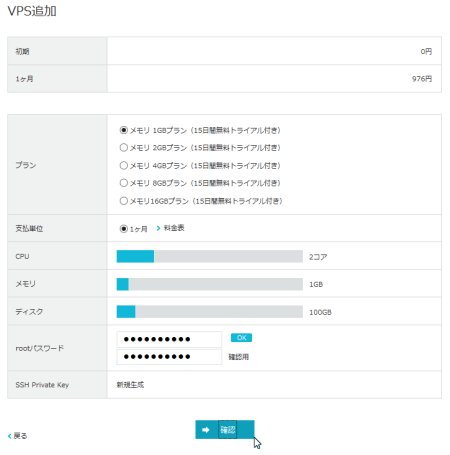
ここでは、メモリ 1G プランを選択しました。
ここでは、OSの選択はできません。必ず CentOSになります。
ConoHa VPS の場合、必ず、VPSの追加 (VPSの作成) という手順から始まります。
これを考えれば、デフォルトでCentOSでなければならない理由はないと思うんですけど、 必ず、CentOS をインストールした上で、OS再インストールを実行しないと 別のOSをインストールできないという変な仕様になっています。
- 先に選択したプランに誤りがないか確認し、決定 をクリックします。
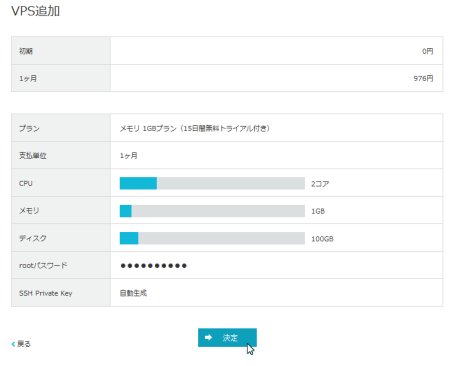
決定以降は、VPSのリストに、構築中の画面が表示されると思います。
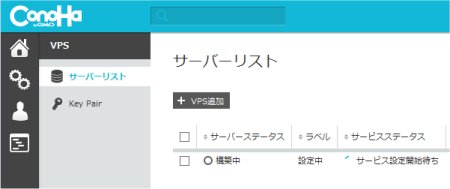
- 最後にVPSを起動する。
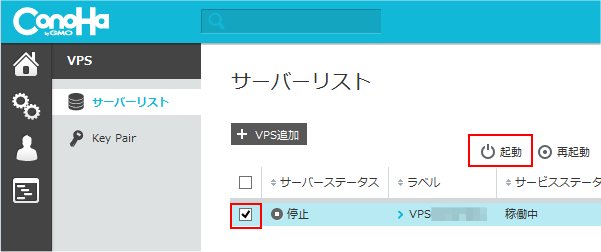
先に作成したVPSにチェックを入れ、起動ボタンをクリックします。
状態が稼働中になってから、起動します。
VPSを作成した当初は、構築中になっていますので、しばらく後に、稼働中へ変化します。その後、起動します。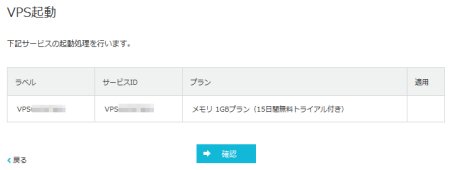
上記の確認ページが表示されたら、確認ボタンをクリックします。
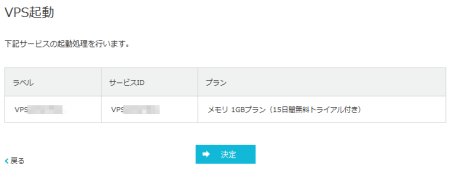
上記の決定ページが表示されたら、決定ボタンをクリックします。
これで、起動します。
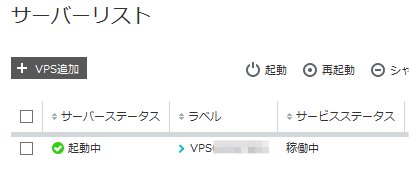
しばらく後に、VPSの状態が起動中に切り替わりますので、これで、VPSへのアクセスができるようになります。
続けて、TeraTerm を用いての SSH でのアクセス方法を簡単に解説しておきます。
- ConoHa VPS のコントロールパネルから SSH Key をダウンロードします。

コントロールパネルの左バーの [ サービス ] – [ VPS ] をクリックします。
続けて、Key Pair をクリックします。
Private Keyダウンロード をクリックすると、SSH Key(RSAキーファイル)をダウンロードできます。
適当なディレクトリへダウンロードしましょう。
ConoHa VPS では、SSH接続する際、デフォルトで SSH Key Pair が必須になります。
- TeraTerm を起動します。
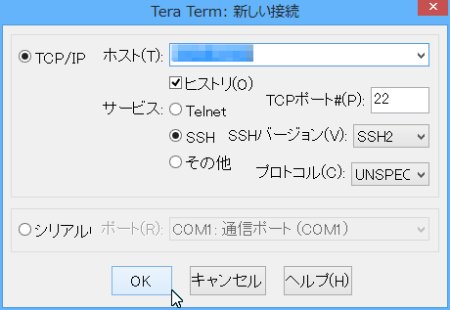
- ホスト : ConoHa VPS で作成したVPSのIPアドレスを指定します。

IPアドレスは、上記のように [ サービス ] – [ VPS ] – [ サーバーリスト ] – [ VPSxxxxx ] – [ DNS逆引き設定 ] で確認することができます。
- サービス : SSH :SSH2 を指定します。
上記の設定を終えたら、OKボタンをクリックします。
- ホスト : ConoHa VPS で作成したVPSのIPアドレスを指定します。
- TeraTerm からSSH接続します。
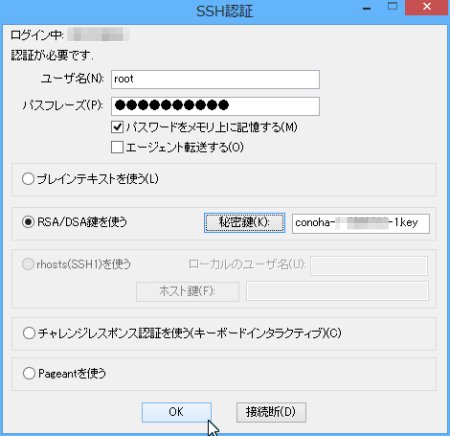
- ユーザ名 : デフォルトではrootのみです。ここでは rootを指定します。
- パスフレーズ : VPSを作成時に指定したパスワードを指定します。
- □ RSA/DSA鍵を使う : チェックします。
秘密鍵ボタンをクリックし、先にダウンロードしたSSH Keyファイルを指定します。
上記の設定を終えたら、OKボタンをクリックします。
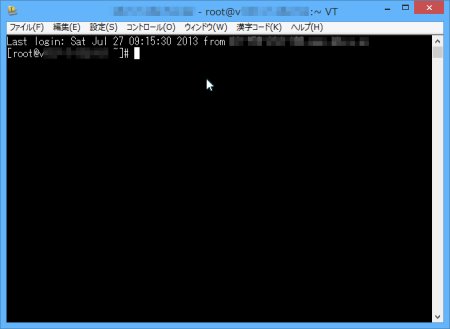
上記のようにプロンプトが表示されればOKです。
ConoHa VPS の CentOS で最初にやっておきたいこと
ConoHa VPS のデフォルトOSである CentOS 6 をインストールすると、基本的なものはインストールされています。
例えば、iptables , vimなどの基本的なツールや、httpd,php なども 既にインストール済です。そのため、ここで使用する iptables , vim については、インストールの説明を割愛します。
デフォルトでインストールされているパッケージの一覧は、以下の詳細表示切替をクリックすると詳細情報が表示されますので、そちらを参照してください。
|
この点では、さくらのVPSやお名前.com VPS(KVM)のように何もインストールされていない状態ではありません。
インストールするバージョンやツールなどにこだわりがある方には、大きなお世話的な感じもしますが、
そうでない方には、少なくともスクリプト系とApacheがインストールされているのは、うれしいかもしれませんね。
結局、これが良いか悪いかは、各ユーザによるところが大きいと思います。
ConoHa VPS の場合、自宅サーバーと違って、既に外部に直接つながった状態ですから、まず、セキュリティ面の強化とサーバー設定をする必要があります。
ここでは、CentOSの初期状態から、各サーバー系をインストールする手前までにやることを記述してみます。
- CentOSを最新にアップデートする。
現在(2013.07.30)では、デフォルトのCentOS のバージョンは、6.4 (64bit版) となります。
これを最新のCentOSへアップデートしましょう。
$ cat /etc/redhat-release CentOS release 6.4 (Final)
$ yum update
 ..
Install 2 Package(s)
Upgrade 28 Package(s)
Total download size: 87 M
Is this ok [y/N]: y
Downloading Packages:
..
tzdata.noarch 0:2013c-2.el6
Complete!
$ cat /etc/redhat-release
..
Install 2 Package(s)
Upgrade 28 Package(s)
Total download size: 87 M
Is this ok [y/N]: y
Downloading Packages:
..
tzdata.noarch 0:2013c-2.el6
Complete!
$ cat /etc/redhat-release CentOS release 6.4 (Final)
ここでは、まず、現在のCentOSのバージョンを確認した後、yum updateでシステムのアップデートを実施しています。
アップデート完了後、再度、現在のCentOSのバージョンを確認し、最新のバージョンになっているいることを確認しています。
ここでは、最新のバージョンなので、変化はありませんでした。
- ユーザを追加する。
ここでは、SSHで唯一ログインを許可するようにしたhogeユーザを追加してみましょう。
$ useradd hoge
$ passwd hoge
Changing password for user hoge.
New UNIX password:
passwd: all authentication tokens updated successfully.
$ usermod -G wheel hoge
$
$
useraddで、hogeというユーザを追加しています。
passwdで、hogeのパスワードを設定しています。
usermodで、hogeをwheelのユーザグループに追加しています。
wheelは、管理者グループになります。
/usr/sbin/ へのパスが設定されていない場合は、useradd などのコマンドを指定する際、フルパスで指定します。
例)
$ /usr/sbin/useradd hoge
- ログイン環境を編集する。
vimを標準のエディタとして使うために、vi のaliasとして登録しておきます。
また、/sbin へのパスも設定しておくと便利です。パスをとおしておくと、いちいち/sbinを先頭にタイプしなくて良くなりますからね。
~hoge/.bash_profile を編集します。
1
2
3
4
5
6
7
8
9
10
11
12
13
14
15
16
... # .bash_profile # Get the aliases and functions if [ -f ~/.bashrc ]; then . ~/.bashrc fi # User specific environment and startup programs PATH=$PATH:$HOME/bin:/sbin:/usr/sbin # alias alias vi='vim' export PATH
11行目で、/sbinと/usr/sbinへのパスと追加しています。
14行目で、vimの別名をviとしています。
現在ログインしている状態で、上記の編集情報を有効にするには、とすればOKです。$ source ~hoge/.bash_profile
- 日本語に対応にする。
CentOSのロケールの設定と同じようにCentOSでも日本に設定します。
/etc/sysconfig/i18nを編集します。
初期状態は以下のようになっています。
LANG="en_US.UTF-8"
SYSFONT="latarcyrheb-sun16"
これを、以下のように変更します。
LANG="ja_JP.UTF-8"
SUPPORTED="ja_JP.UTF-8:ja_JP:ja"
SYSFONT="latarcyrheb-sun16"
- SSHのポートを変更する。
まずは、SSHのポートを変更して、簡単にアタックされないようにしておきます。指定するポート番号は、10000以降の適当なポート番号を割り当てましょう。
/etc/ssh/sshd_config を編集します。
...
# ポート番号を 22 (デフォルト)から10022へ変更する
#Port 22
Port 10022
...
# SSHのプロトコルをSSH2のみ対応とする
Protocol 2
...
# rootでのログインを不可とする
PermitRootLogin no
...
# パスワードでのログインを許可する
PasswordAuthentication yes
...
# パスワードなしでのログインを不可とする
PermitEmptyPasswords no
...

# 以下は、rootによるログインをパスワードなしで、Pubkeyによる認証のみで可としています。
# 全てコメントアウトする。
#Match User root
#        PubkeyAuthentication yes
#        PasswordAuthentication no

# ここでは、rootからの直接のログインを不可として、
# hoge というユーザだけログインを許可する
AllowUsers hoge
ここでは、ポート番号、SSHプロトコル、rootでのログイン不可、ログイン可能なユーザ名を指定しています。
(後でhogeというユーザを追加しています。)
また、ログインするIPアドレスが決まっているなら、許可するIPアドレスも指定した方がより良いです。
公開鍵認証方式 のみを採用し、パスワードによる認証を不可とする場合は、以下のような設定になります。公開鍵認証方式 の方が、パスワード認証より、よりセキュアであることは間違いありませんから、 こちらの設定の方が良いでしょう。... # パスワードによる認証を不可をする PasswordAuthentication no ... # 公開鍵認証方式による認証を許可する PubkeyAuthentication yes ...
ConoHaでは、公開鍵認証のための Private Key が、いつでもダウンロードできますので、こちらの方が良いでしょう。
さらにセキュアにするには、公開鍵を作成する際に パスフレーズを設定することで、Private Key だけでなく パスフレーズ の入力を求めることができます。 この時のパスフレーズ は、ユーザパスワードではないことに注意する必要があります。
設定を終えたら、sshd の設定ファイル再読み込みを実施します。
$ /etc/init.d/sshd reload
sshd を再読み込み中:                                       [  OK  ]
$
この状態で、上記の例で言うと、
ユーザ : hoge
ポート番号 : 10022
でログインできるか確認しましょう。
ログインできればOKです。
できない場合は、設定を再度見直しましょう。
sshd reload がポイントです。
とりあえず、再読み込みの場合は、現在SSHで接続しているクライアントには影響ありません。そのため、もしも設定に誤りがあった場合に、再編集することができます。
sshd を再起動してしまうと、現在接続しているクライアントは解放されてしまうので注意が必要です。
ここでは、詳しく解説していませんが、さらにセキュリティを強化するために公開鍵認証にてログインするようにしておいた方が良いでしょう。
(詳しくは、TeraTermで 公開鍵認証(鍵交換)を使ってSSH 接続してみる を参照してください。)
- ファイアウォール(iptables)の設定を行う。
ここでは、単純にiptablesを使っていないポートを外部に非公開とするようにします。
シェルファイルを作成して、一気にやってしまいます。
1
2
3
4
5
6
7
8
9
10
11
12
13
14
15
16
17
18
19
20
21
22
23
24
25
26
#!/bin/sh /sbin/iptables -F /sbin/iptables -X /sbin/iptables -P INPUT DROP /sbin/iptables -P OUTPUT ACCEPT /sbin/iptables -P FORWARD DROP /sbin/iptables -A INPUT -i lo -j ACCEPT /sbin/iptables -A OUTPUT -o lo -j ACCEPT /sbin/iptables -A INPUT -s 10.0.0.0/8 -j DROP /sbin/iptables -A INPUT -s 172.16.0.0/12 -j DROP /sbin/iptables -A INPUT -s 192.168.0.0/16 -j DROP /sbin/iptables -A INPUT -p icmp --icmp-type echo-request -j ACCEPT /sbin/iptables -A INPUT -p tcp --dport 10022 -j ACCEPT /sbin/iptables -A INPUT -p tcp --dport 80 -j ACCEPT /sbin/iptables -A INPUT -m state --state ESTABLISHED,RELATED -j ACCEPT /etc/rc.d/init.d/iptables save /sbin/service iptables restart
ここでは、10022(SSH),80(HTTP)の2つのポートのみを公開し、それ以外をすべて非公開にしています。
また、プライベートIPアドレス(10.x.x.x,172.16.x.x,192.168.x.x)は、すべて拒否してます。
pingを受け付けたくない場合は、17行目のicmpの許可を行っているところをコメントアウトしてください。
また、上記は、必要最小限のポートしか開いていません。pop3やmailなどの必要なポートは、19行目を真似て開くと良いでしょう。... # sendmail /sbin/iptables -A INPUT -p tcp --dport 25 -j ACCEPT /sbin/iptables -A INPUT -p tcp --dport 465 -j ACCEPT /sbin/iptables -A INPUT -p tcp --dport 587 -j ACCEPT #dovecot pops , imaps /sbin/iptables -A INPUT -p tcp --dport 995 -j ACCEPT /sbin/iptables -A INPUT -p tcp --dport 993 -j ACCEPT ...
ファイルにしたら、実行権限を与えるのを忘れないでね。で実行できるはずです。$ chmod +x ファイル名 $ ./ファイル名
SSHのポートだけは、絶対に間違えないようにしましょう。この例では、10022を開放しています。
誤ってSSHのポートを閉じてしまうと、二度とアクセスできなくなります。 ConoHa VPS では、現在(2013.07.30)、リモートコンソールが提供されていますので、最悪の場合は、リモートコンソールからのアクセスで修正することができます。
- 不要なサービス(デーモン)を停止する。
最後に、無駄に動作しているプロセスを停止するようにします。
デフォルトで動作している全プロセスは、以下のとおりです。
$ ps aux
USER       PID %CPU %MEM    VSZ   RSS TTY      STAT START   TIME COMMAND
root         1  0.0  0.1  19228  1484 ?        Ss   Jul30   0:00 /sbin/init
root         2  0.0  0.0      0     0 ?        S    Jul30   0:00 [kthreadd]
root         3  0.0  0.0      0     0 ?        S    Jul30   0:00 [migration/0]
root         4  0.0  0.0      0     0 ?        S    Jul30   0:00 [ksoftirqd/0]
root         5  0.0  0.0      0     0 ?        S    Jul30   0:00 [migration/0]
root         6  0.0  0.0      0     0 ?        S    Jul30   0:00 [watchdog/0]
root         7  0.0  0.0      0     0 ?        S    Jul30   0:00 [migration/1]
root         8  0.0  0.0      0     0 ?        S    Jul30   0:00 [migration/1]
root         9  0.0  0.0      0     0 ?        S    Jul30   0:00 [ksoftirqd/1]
root        10  0.0  0.0      0     0 ?        S    Jul30   0:00 [watchdog/1]
root        11  0.0  0.0      0     0 ?        S    Jul30   0:01 [events/0]
root        12  0.0  0.0      0     0 ?        S    Jul30   0:02 [events/1]
root        13  0.0  0.0      0     0 ?        S    Jul30   0:00 [cgroup]
root        14  0.0  0.0      0     0 ?        S    Jul30   0:00 [khelper]
root        15  0.0  0.0      0     0 ?        S    Jul30   0:00 [netns]
root        16  0.0  0.0      0     0 ?        S    Jul30   0:00 [async/mgr]
root        17  0.0  0.0      0     0 ?        S    Jul30   0:00 [pm]
root        18  0.0  0.0      0     0 ?        S    Jul30   0:00 [sync_supers]
root        19  0.0  0.0      0     0 ?        S    Jul30   0:00 [bdi-default]
root        20  0.0  0.0      0     0 ?        S    Jul30   0:00 [kintegrityd/0]
root        21  0.0  0.0      0     0 ?        S    Jul30   0:00 [kintegrityd/1]
root        22  0.0  0.0      0     0 ?        S    Jul30   0:00 [kblockd/0]
root        23  0.0  0.0      0     0 ?        S    Jul30   0:00 [kblockd/1]
root        24  0.0  0.0      0     0 ?        S    Jul30   0:00 [kacpid]
root        25  0.0  0.0      0     0 ?        S    Jul30   0:00 [kacpi_notify]
root        26  0.0  0.0      0     0 ?        S    Jul30   0:00 [kacpi_hotplug]
root        27  0.0  0.0      0     0 ?        S    Jul30   0:00 [ata/0]
root        28  0.0  0.0      0     0 ?        S    Jul30   0:00 [ata/1]
root        29  0.0  0.0      0     0 ?        S    Jul30   0:00 [ata_aux]
root        30  0.0  0.0      0     0 ?        S    Jul30   0:00 [ksuspend_usbd]
root        31  0.0  0.0      0     0 ?        S    Jul30   0:00 [khubd]
root        32  0.0  0.0      0     0 ?        S    Jul30   0:00 [kseriod]
root        33  0.0  0.0      0     0 ?        S    Jul30   0:00 [md/0]
root        34  0.0  0.0      0     0 ?        S    Jul30   0:00 [md/1]
root        35  0.0  0.0      0     0 ?        S    Jul30   0:00 [md_misc/0]
root        36  0.0  0.0      0     0 ?        S    Jul30   0:00 [md_misc/1]
root        37  0.0  0.0      0     0 ?        S    Jul30   0:00 [khungtaskd]
root        38  0.0  0.0      0     0 ?        S    Jul30   0:00 [kswapd0]
root        39  0.0  0.0      0     0 ?        SN   Jul30   0:00 [ksmd]
root        40  0.0  0.0      0     0 ?        SN   Jul30   0:00 [khugepaged]
root        41  0.0  0.0      0     0 ?        S    Jul30   0:00 [aio/0]
root        42  0.0  0.0      0     0 ?        S    Jul30   0:00 [aio/1]
root        43  0.0  0.0      0     0 ?        S    Jul30   0:00 [crypto/0]
root        44  0.0  0.0      0     0 ?        S    Jul30   0:00 [crypto/1]
root        49  0.0  0.0      0     0 ?        S    Jul30   0:00 [kthrotld/0]
root        50  0.0  0.0      0     0 ?        S    Jul30   0:00 [kthrotld/1]
root        52  0.0  0.0      0     0 ?        S    Jul30   0:00 [kpsmoused]
root        53  0.0  0.0      0     0 ?        S    Jul30   0:00 [usbhid_resume]
root        84  0.0  0.0      0     0 ?        S    Jul30   0:00 [kstriped]
root       267  0.0  0.0      0     0 ?        S    Jul30   0:00 [scsi_eh_0]
root       268  0.0  0.0      0     0 ?        S    Jul30   0:00 [scsi_eh_1]
root       290  0.0  0.0      0     0 ?        S    Jul30   0:00 [virtio-blk]
root       396  0.0  0.0      0     0 ?        S    Jul30   0:00 [kdmflush]
root       398  0.0  0.0      0     0 ?        S    Jul30   0:00 [kdmflush]
root       417  0.0  0.0      0     0 ?        S    Jul30   0:00 [jbd2/dm-0-8]
root       418  0.0  0.0      0     0 ?        S    Jul30   0:00 [ext4-dio-unwr]
root       419  0.0  0.0      0     0 ?        S    Jul30   0:00 [ext4-dio-unwr]
root       510  0.0  0.0  10688   536 ?        S<s  Jul30   0:00 /sbin/udevd -d
root       684  0.0  0.0      0     0 ?        S    Jul30   0:00 [virtio-net]
root       693  0.0  0.0      0     0 ?        S    Jul30   0:00 [vballoon]
root       909  0.0  0.0      0     0 ?        S    Jul30   0:00 [jbd2/vda1-8]
root       910  0.0  0.0      0     0 ?        S    Jul30   0:00 [ext4-dio-unwr]
root       911  0.0  0.0      0     0 ?        S    Jul30   0:00 [ext4-dio-unwr]
root       912  0.0  0.0      0     0 ?        S    Jul30   0:00 [jbd2/vdb-8]
root       913  0.0  0.0      0     0 ?        S    Jul30   0:00 [ext4-dio-unwr]
root       914  0.0  0.0      0     0 ?        S    Jul30   0:00 [ext4-dio-unwr]
root       949  0.0  0.0      0     0 ?        S    Jul30   0:00 [kauditd]
root      1142  0.0  0.0      0     0 ?        S    Jul30   0:00 [flush-253:0]
root      1207  0.0  0.0   9116   560 ?        Ss   Jul30   0:00 /sbin/dhclient
root      1302  0.0  0.0   9116   712 ?        Ss   Jul30   0:00 /sbin/dhclient
root      1335  0.0  0.0  27636   844 ?        S<sl Jul30   0:00 auditd
root      1351  0.0  0.3 249148  3712 ?        Sl   Jul30   0:00 /sbin/rsyslogd
root      1363  0.0  0.0  10816   600 ?        Ss   Jul30   0:02 irqbalance
root      1466  0.0  0.0   4076   652 ?        Ss   Jul30   0:00 /usr/sbin/acpid
ntp       1494  0.0  0.1  30160  1644 ?        Ss   Jul30   0:00 ntpd -u ntp:ntp
root      1570  0.0  0.3  78728  3300 ?        Ss   Jul30   0:00 /usr/libexec/po
postfix   1592  0.0  0.3  78980  3312 ?        S    Jul30   0:00 qmgr -l -t fifo
root      1594  0.0  0.0 110176   928 ?        Ss   Jul30   0:00 /usr/sbin/abrtd
root      1602  0.0  0.0 108064   880 ?        Ss   Jul30   0:00 abrt-dump-oops
root      1610  0.0  0.1 117208  1276 ?        Ss   Jul30   0:00 crond
root      1621  0.0  0.0  21452   480 ?        Ss   Jul30   0:00 /usr/sbin/atd
root      1644  0.0  0.0   4076   600 ttyS0    Ss+  Jul30   0:00 /sbin/agetty /d
root      1646  0.0  0.0   4060   536 tty1     Ss+  Jul30   0:00 /sbin/mingetty
root      1648  0.0  0.0   4060   540 tty2     Ss+  Jul30   0:00 /sbin/mingetty
root      1650  0.0  0.0   4060   536 tty3     Ss+  Jul30   0:00 /sbin/mingetty
root      1651  0.0  0.0  10684   520 ?        S<   Jul30   0:00 /sbin/udevd -d
root      1652  0.0  0.0  10684   520 ?        S<   Jul30   0:00 /sbin/udevd -d
root      1654  0.0  0.0   4060   540 tty4     Ss+  Jul30   0:00 /sbin/mingetty
root      1656  0.0  0.0   4060   536 tty5     Ss+  Jul30   0:00 /sbin/mingetty
root      1658  0.0  0.0   4060   540 tty6     Ss+  Jul30   0:00 /sbin/mingetty
root      1659  0.0  0.3  97864  3872 ?        Rs   Jul30   0:00 sshd: root@pts/
root      1661  0.0  0.1 108336  1828 pts/0    Ss   Jul30   0:00 -bash
postfix  15817  0.0  0.3  78808  3264 ?        S    01:22   0:00 pickup -l -t fi
root     15824  0.0  0.1  64116  1184 ?        Ss   01:22   0:00 /usr/sbin/sshd
root     15851  0.0  0.1 110236  1136 pts/0    R+   01:31   0:00 ps aux


$ chkconfig --list
abrt-ccpp       0:off   1:off   2:off   3:on    4:off   5:on    6:off
abrt-oops       0:off   1:off   2:off   3:on    4:off   5:on    6:off
abrtd           0:off   1:off   2:off   3:on    4:off   5:on    6:off
acpid           0:off   1:off   2:on    3:on    4:on    5:on    6:off
atd             0:off   1:off   2:off   3:on    4:on    5:on    6:off
auditd          0:off   1:off   2:on    3:on    4:on    5:on    6:off
blk-availability        0:off   1:on    2:on    3:off   4:on    5:on    6:off
cgconfig        0:off   1:off   2:off   3:off   4:off   5:off   6:off
cgred           0:off   1:off   2:off   3:off   4:off   5:off   6:off
cloud-config    0:off   1:off   2:on    3:on    4:on    5:on    6:off
cloud-final     0:off   1:off   2:on    3:on    4:on    5:on    6:off
cloud-init      0:off   1:off   2:on    3:on    4:on    5:on    6:off
cloud-init-local        0:off   1:off   2:on    3:on    4:on    5:on    6:off
cpuspeed        0:off   1:on    2:on    3:off   4:on    5:on    6:off
crond           0:off   1:off   2:on    3:on    4:on    5:on    6:off
htcacheclean    0:off   1:off   2:off   3:off   4:off   5:off   6:off
httpd           0:off   1:off   2:off   3:off   4:off   5:off   6:off
ip6tables       0:off   1:off   2:on    3:on    4:on    5:on    6:off
iptables        0:off   1:off   2:on    3:on    4:on    5:on    6:off
irqbalance      0:off   1:off   2:off   3:on    4:on    5:on    6:off
kdump           0:off   1:off   2:off   3:off   4:on    5:on    6:off
lvm2-monitor    0:off   1:on    2:on    3:on    4:on    5:on    6:off
mdmonitor       0:off   1:off   2:on    3:on    4:on    5:on    6:off
netconsole      0:off   1:off   2:off   3:off   4:off   5:off   6:off
netfs           0:off   1:off   2:off   3:on    4:on    5:on    6:off
network         0:off   1:off   2:on    3:on    4:on    5:on    6:off
ntpd            0:off   1:off   2:off   3:on    4:off   5:off   6:off
ntpdate         0:off   1:off   2:off   3:off   4:off   5:off   6:off
postfix         0:off   1:off   2:on    3:on    4:on    5:on    6:off
psacct          0:off   1:off   2:off   3:off   4:off   5:off   6:off
quota_nld       0:off   1:off   2:off   3:off   4:off   5:off   6:off
rdisc           0:off   1:off   2:off   3:off   4:off   5:off   6:off
restorecond     0:off   1:off   2:off   3:off   4:off   5:off   6:off
rngd            0:off   1:off   2:off   3:off   4:off   5:off   6:off
rsyslog         0:off   1:off   2:on    3:on    4:on    5:on    6:off
saslauthd       0:off   1:off   2:off   3:off   4:off   5:off   6:off
smartd          0:off   1:off   2:off   3:off   4:off   5:off   6:off
sshd            0:off   1:off   2:on    3:on    4:on    5:on    6:off
svnserve        0:off   1:off   2:off   3:off   4:off   5:off   6:off
sysstat         0:off   1:on    2:on    3:on    4:on    5:on    6:off
udev-post       0:off   1:on    2:on    3:on    4:on    5:on    6:off
動作している各サービスは、以下のようなものです。
abrt-ccpp アプリケーションのクラッシュならびにカーネル oops の検出 ON – abrt-oops ON – abrtd ON – acpid 電源管理 ON – atd コマンドの遅延実行を有効 ON – auditd システム監査結果のログ保存 OFF – blk-availability LVM2のミラーデバイスの管理 ON – cgconfig Control Group 管理 OFF – cgred タスクを cgroup に移動 OFF – cloud-config cloud-init関連 ON – cloud-final ON – cloud-init ON – cloud-init-local ON – cpuspeed CPU管理 ON – crond cronデーモン ON – htcacheclean apacheキャッシュクリア OFF – httpd apache OFF – ip6tables ipv6用iptables OFF – iptables iptables (ファイアウォール) ON – irqbalance IRQ CPU間 負荷分散 管理 ON – kdump カーネルダンプ ON – lvm2-monitor LVMの障害監視 ON OFF
※LVMを使っていない場合のみmdmonitor ソフトウェアRAIDモニタリングデーモン ON – netconsole ネットコンソール(カーネル異常時に出力先として用いられるコンソール) OFF – netfs NFSクライアント OFF – network ネットワークサービス ON – ntpd 時計管理 ON – ntpdate 時計管理 OFF – postfix postfix(smtpサーバー) ON – psacct コマンド履歴管理 OFF – quota_nld クォータ値超過が発生した旨のカーネルメッセージを D-BUS に転送 OFF – rdisc ネットワークルータディスカバリーデーモン。ルータとして動作させないのであれば不要。 OFF – restorecond SELinuxの運用サポート OFF – rngd 乱数を発生させるためのデーモン OFF – rsyslog シスログデーモン ON – saslauthd sasl認証サービス OFF – sshd SSHデーモン ON – svnserve Subversion 用デーモン OFF – sysstat システム状態監視デーモン ON – udev-post ハードウェア自動認識を行うデーモン ON –
上記の動作しているデーモンでは、ほとんど、デフォルトのままでOKだと思います。
論理ボリュームマネージャー(LVM)を使わない方(よくわからない方)には、lvm2-monitorも停止しても問題ないでしょう。(よくわからない方は、そのままにしておきましょう。)
#!/bin/sh

/sbin/chkconfig lvm2-monitor off
ファイルにしたら、実行権限を与えるのを忘れないようにしましょう。と、このような入力イメージで実行できるはずです。$ chmod +x ファイル名 $ ./ファイル名
 acpid : 電源管理 は、
立ち上げておいた方が良いです。ホスト側でリブートなどした場合、電源断を検知してくれるので、より安全に再起動できます。
- 要らないコンソールを無効にする
不要なコンソールは、デフォルトで設定されているtty1からtty6 を tty1のみとします。
/etc/sysconfig/init を編集します。... # What ttys should gettys be started on? #ACTIVE_CONSOLES=/dev/tty[1-6] ACTIVE_CONSOLES=/dev/tty1 ...
- selinuxをoffにする
ConoHa VPS では、デフォルトで無効になっています。そのため、以下の設定は不要のはずですが、一応、記載しておきます。
SELINUX=enforcing を SELINUX=disabled とし、無効にします。
/etc/sysconfig/selinux を編集します。... #SELINUX=enforcing SELINUX=disabled ...
リブートなしに無効にするには、以下の設定も行います。
###  setenforce で無効にします。
$ setenforce 0

###  getenforceで無効を確認します。
$ getenforce
Permissive
- 最後にシステムリブートする
全ての設定を終えたら、システムのリブートを実施します。
$ free
             total       used       free     shared    buffers     cached
Mem:       1020416     899492     120924          0      60904     708916
-/+ buffers/cache:     129672     890744
Swap:      2064376        508    2063868
$ reboot
...
...
再起動したら、とりあえずメモリとプロセスを確認しておきましょう。
$ free
             total       used       free     shared    buffers     cached
Mem:       1020412     110384     910028          0      12420      39656
-/+ buffers/cache:      58308     962104
Swap:      2064376          0    2064376

$ ps aux
USER       PID %CPU %MEM    VSZ   RSS TTY      STAT START   TIME COMMAND
root         1  0.9  0.1  19228  1512 ?        Ss   04:15   0:00 /sbin/init
root         2  0.0  0.0      0     0 ?        S    04:15   0:00 [kthreadd]
root         3  0.0  0.0      0     0 ?        S    04:15   0:00 [migration/0]
root         4  0.0  0.0      0     0 ?        S    04:15   0:00 [ksoftirqd/0]
root         5  0.0  0.0      0     0 ?        S    04:15   0:00 [migration/0]
root         6  0.0  0.0      0     0 ?        S    04:15   0:00 [watchdog/0]
root         7  0.0  0.0      0     0 ?        S    04:15   0:00 [migration/1]
root         8  0.0  0.0      0     0 ?        S    04:15   0:00 [migration/1]
root         9  0.0  0.0      0     0 ?        S    04:15   0:00 [ksoftirqd/1]
root        10  0.0  0.0      0     0 ?        S    04:15   0:00 [watchdog/1]
root        11  0.0  0.0      0     0 ?        S    04:15   0:00 [events/0]
root        12  0.0  0.0      0     0 ?        S    04:15   0:00 [events/1]
root        13  0.0  0.0      0     0 ?        S    04:15   0:00 [cgroup]
root        14  0.0  0.0      0     0 ?        S    04:15   0:00 [khelper]
root        15  0.0  0.0      0     0 ?        S    04:15   0:00 [netns]
root        16  0.0  0.0      0     0 ?        S    04:15   0:00 [async/mgr]
root        17  0.0  0.0      0     0 ?        S    04:15   0:00 [pm]
root        18  0.0  0.0      0     0 ?        S    04:15   0:00 [sync_supers]
root        19  0.0  0.0      0     0 ?        S    04:15   0:00 [bdi-default]
root        20  0.0  0.0      0     0 ?        S    04:15   0:00 [kintegrityd/0]
root        21  0.0  0.0      0     0 ?        S    04:15   0:00 [kintegrityd/1]
root        22  0.0  0.0      0     0 ?        S    04:15   0:00 [kblockd/0]
root        23  0.0  0.0      0     0 ?        S    04:15   0:00 [kblockd/1]
root        24  0.0  0.0      0     0 ?        S    04:15   0:00 [kacpid]
root        25  0.0  0.0      0     0 ?        S    04:15   0:00 [kacpi_notify]
root        26  0.0  0.0      0     0 ?        S    04:15   0:00 [kacpi_hotplug]
root        27  0.0  0.0      0     0 ?        S    04:15   0:00 [ata/0]
root        28  0.0  0.0      0     0 ?        S    04:15   0:00 [ata/1]
root        29  0.0  0.0      0     0 ?        S    04:15   0:00 [ata_aux]
root        30  0.0  0.0      0     0 ?        S    04:15   0:00 [ksuspend_usbd]
root        31  0.0  0.0      0     0 ?        S    04:15   0:00 [khubd]
root        32  0.0  0.0      0     0 ?        S    04:15   0:00 [kseriod]
root        33  0.0  0.0      0     0 ?        S    04:15   0:00 [md/0]
root        34  0.0  0.0      0     0 ?        S    04:15   0:00 [md/1]
root        35  0.0  0.0      0     0 ?        S    04:15   0:00 [md_misc/0]
root        36  0.0  0.0      0     0 ?        S    04:15   0:00 [md_misc/1]
root        37  0.0  0.0      0     0 ?        S    04:15   0:00 [khungtaskd]
root        38  0.0  0.0      0     0 ?        S    04:15   0:00 [kswapd0]
root        39  0.0  0.0      0     0 ?        SN   04:15   0:00 [ksmd]
root        40  0.0  0.0      0     0 ?        SN   04:15   0:00 [khugepaged]
root        41  0.0  0.0      0     0 ?        S    04:15   0:00 [aio/0]
root        42  0.0  0.0      0     0 ?        S    04:15   0:00 [aio/1]
root        43  0.0  0.0      0     0 ?        S    04:15   0:00 [crypto/0]
root        44  0.0  0.0      0     0 ?        S    04:15   0:00 [crypto/1]
root        49  0.0  0.0      0     0 ?        S    04:15   0:00 [kthrotld/0]
root        50  0.0  0.0      0     0 ?        S    04:15   0:00 [kthrotld/1]
root        52  0.0  0.0      0     0 ?        S    04:15   0:00 [kpsmoused]
root        53  0.0  0.0      0     0 ?        S    04:15   0:00 [usbhid_resume]
root        84  0.0  0.0      0     0 ?        S    04:15   0:00 [kstriped]
root       348  0.0  0.0      0     0 ?        S    04:15   0:00 [scsi_eh_0]
root       349  0.0  0.0      0     0 ?        S    04:15   0:00 [scsi_eh_1]
root       383  0.0  0.0      0     0 ?        S    04:15   0:00 [virtio-blk]
root       427  0.0  0.0      0     0 ?        S    04:15   0:00 [kdmflush]
root       428  0.0  0.0      0     0 ?        S    04:15   0:00 [kdmflush]
root       446  0.0  0.0      0     0 ?        S    04:15   0:00 [jbd2/dm-0-8]
root       447  0.0  0.0      0     0 ?        S    04:15   0:00 [ext4-dio-unwr]
root       448  0.0  0.0      0     0 ?        S    04:15   0:00 [ext4-dio-unwr]
root       495  1.1  0.0      0     0 ?        S    04:15   0:00 [kauditd]
root       542  0.0  0.0  10712   796 ?        S<s  04:15   0:00 /sbin/udevd -d
root       721  0.0  0.0      0     0 ?        S    04:15   0:00 [virtio-net]
root       730  0.0  0.0      0     0 ?        S    04:15   0:00 [vballoon]
root       890  0.0  0.0  10708   840 ?        S<   04:15   0:00 /sbin/udevd -d
root       920  0.0  0.0      0     0 ?        S    04:15   0:00 [jbd2/vda1-8]
root       921  0.0  0.0      0     0 ?        S    04:15   0:00 [ext4-dio-unwr]
root       922  0.0  0.0      0     0 ?        S    04:15   0:00 [ext4-dio-unwr]
root       923  0.0  0.0      0     0 ?        S    04:15   0:00 [jbd2/vdb-8]
root       924  0.0  0.0      0     0 ?        S    04:15   0:00 [ext4-dio-unwr]
root       925  0.0  0.0      0     0 ?        S    04:15   0:00 [ext4-dio-unwr]
root       926  0.0  0.0      0     0 ?        S    04:15   0:00 [flush-252:0]
root       927  0.0  0.0      0     0 ?        S    04:15   0:00 [flush-252:16]
root       928  0.0  0.0      0     0 ?        S    04:15   0:00 [flush-253:0]
root      1262  0.0  0.0   9116   684 ?        Ss   04:15   0:00 /sbin/dhclient
root      1357  0.0  0.0   9116   720 ?        Ss   04:15   0:00 /sbin/dhclient
root      1390  0.0  0.1 249144  1580 ?        Sl   04:15   0:00 /sbin/rsyslogd
root      1402  0.0  0.0  10816   608 ?        Ss   04:15   0:00 irqbalance
root      1463  0.0  0.0   4076   648 ?        Ss   04:15   0:00 /usr/sbin/acpid
root      1480  0.0  0.1  64116  1192 ?        Ss   04:15   0:00 /usr/sbin/sshd
ntp       1488  0.0  0.1  30160  1640 ?        Ss   04:15   0:00 ntpd -u ntp:ntp
root      1564  0.0  0.3  78728  3296 ?        Ss   04:15   0:00 /usr/libexec/po
postfix   1585  0.0  0.3  78808  3264 ?        S    04:15   0:00 pickup -l -t fi
postfix   1586  0.0  0.3  78876  3304 ?        S    04:15   0:00 qmgr -l -t fifo
root      1587  0.0  0.0 108112   924 ?        Ss   04:15   0:00 abrt-dump-oops
root      1596  0.0  0.0 110224   928 ?        Ss   04:15   0:00 /usr/sbin/abrtd
root      1604  0.0  0.1 117212  1276 ?        Ss   04:15   0:00 crond
root      1615  0.0  0.0  21452   476 ?        Ss   04:15   0:00 /usr/sbin/atd
root      1641  0.0  0.0   4060   536 tty1     Ss+  04:15   0:00 /sbin/mingetty
root      1642  0.0  0.0   4076   596 ttyS0    Ss+  04:15   0:00 /sbin/agetty /d
root      1643  0.1  0.3  97876  3960 ?        Ss   04:15   0:00 sshd: hoge [pri
root      1662  0.0  0.0  27636   824 ?        S<sl 04:15   0:00 auditd
hoge      1679  0.0  0.1  97876  1856 ?        S    04:15   0:00 sshd: hoge@pts/
hoge      1680  0.0  0.1 108344  1780 pts/0    Ss   04:15   0:00 -bash
hoge      1700  0.0  0.1 110240  1136 pts/0    R+   04:16   0:00 ps aux
少しは無駄なメモリは減ったでしょうか。
ここに書いているのは、あくまで必要最小限としての記載ですので、ユーザによっては、もっと、セキュリティ面で強化を図ることもできると思います。
ConoHa VPS は、お名前.com VPS(KVM) と同じように基本的なもののみプレインストールされています。 PHP,httpd(Apache)が、インストールされてはいますが、それ以上ではないようです。サービスも止まっています。CentOS 6.4 に上がったせいでもあるでしょうが、監視系が増えていますね。
ほとんどは、デフォルトの設定でOKのようです。
ただ、ここで紹介している設定の内、以下の2点だけはやっておいた方が良いと思います。
・sshのポート変更
・iptableの設定
最後に、いろいろ設定してみて、Logwatch ぐらいは確認しておきましょう。
変なアクセスがないかぐらいは、チェックしておきましょう。
ConoHa VPSを試してみたい方は、http://www.conoha.jp/からどうぞ。無料お試し期間は15日です。

このサイトでは、コンテンツの一部が非表示、あるいは、コメント、お問い合わせの投稿ができない、検索ができないことがあります。

 )
)


コメントを投稿 :