今回は、VMWareにてインストールした CentOS/Scientific Linux に VMware Tools をインストールしてみます。
VMWareにてインストールした Windows系のOSであれば、単純にインストーラからインストールすればOKです。
Linux系OSでは、Perlスクリプトで記述されたインストーラ(CUI)を使ってインストールすることになります。
Linux系OSの場合、VMware Playerが古すぎる(2.5以下)場合、どうしてもコンパイルエラーが発生して、自前でそのエラーを取り除かないといけなくなります。
そのため、VMware Playerは、少なくとも 3.0 以上を利用されることを、強くおすすめします。
ここでは、VMware Player 4.0 を利用した解説を行います。
- 目次
- 履歴
2011年10月28日 初版
VMware Tools をインストールする
VMware Tools がインストールされていない場合、VMware Playerを起動した際、以下のような画面が表示されます。
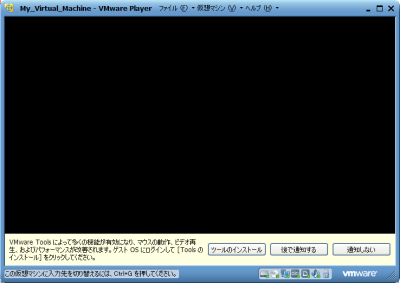
この画面から、以降、簡単に解説します。
- 画面下の[ ツールのインストール ]ボタンをクリックしてVMware Toolsの最新版をダウンロードします。
(既に最新版がダウンロードされている場合は、ダウンロードの処理はなく、以下のダウンロード完了画面がすぐに表示されます。)
最新版のダウンロードが完了すると以下の画面表示に切り替わります。
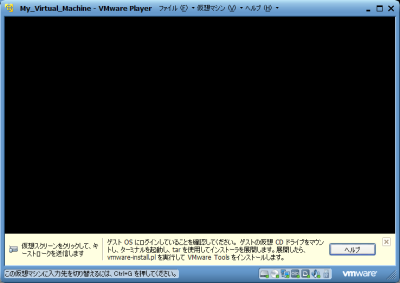
この画面が表示されたときには、既にダウンロードが完了し、ダウンロードしたISOファイルをCD-ROMに接続した状態になっています。
ダウンロード先は、VMware Playerのインストール先になります。
例)以下は、HOST OS がWinodwsの場合です。
C:\Program Files\VMware\VMware Player\linux.iso
- CD-ROM ( ISOファイル ) をマウントします。
$ cd /mnt/
[mnt]$ mkdir cdrom
[mnt]$ mount /dev/cdrom /mnt/cdrom
mount: ブロックデバイス /dev/cdrom は書き込み禁止です、読込み専用でマウントします
[mnt]$ ls cdrom/
VMwareTools-8.8.0-471268.tar.gz  manifest.txt
これでlinux.isoの中身を確認できたはずです。
- VMwareTools の圧縮ファイルを適当なディレクトリへコピーします。
[mnt]$ cp cdrom/VMwareTools-8.8.0-471268.tar.gz ~hoge/.
- VMwareTools の圧縮ファイルを適当なディレクトリで解凍します。
[mnt]$ cd ~hoge/
[hoge]$ tar xvfz VMwareTools-8.8.0-471268.tar.gz
...
[hoge]$
- VMwareTools を vmware-install.pl を使ってインスールします。
CentOS 5
[hoge]$ ls
VMwareTools-8.8.0-471268.tar.gz  vmware-tools-distrib
[hoge]$ cd vmware-tools-distrib/
[vmware-tools-distrib]$ ls
FILES  INSTALL  bin  doc  etc  installer  lib  vmware-install.pl
[vmware-tools-distrib]$ ./vmware-install.pl
Creating a new VMware Tools installer database using the tar4 format.

Installing VMware Tools.

In which directory do you want to install the binary files?
[/usr/bin]

What is the directory that contains the init directories (rc0.d/ to rc6.d/)?
[/etc/rc.d]

What is the directory that contains the init scripts?
[/etc/rc.d/init.d]

In which directory do you want to install the daemon files?
[/usr/sbin]

In which directory do you want to install the library files?
[/usr/lib/vmware-tools]

The path "/usr/lib/vmware-tools" does not exist currently. This program is
going to create it, including needed parent directories. Is this what you want?
[yes]

In which directory do you want to install the documentation files?
[/usr/share/doc/vmware-tools]

The path "/usr/share/doc/vmware-tools" does not exist currently. This program
is going to create it, including needed parent directories. Is this what you
want? [yes]

The installation of VMware Tools 8.8.0 build-471268 for Linux completed
successfully. You can decide to remove this software from your system at any
time by invoking the following command: "/usr/bin/vmware-uninstall-tools.pl".

Before running VMware Tools for the first time, you need to configure it by
invoking the following command: "/usr/bin/vmware-config-tools.pl". Do you want
this program to invoke the command for you now? [yes]

Initializing...


Making sure services for VMware Tools are stopped.

Stopping VMware Tools services in the virtual machine:
   Guest operating system daemon:                          [  OK  ]
   Virtual Printing daemon:                                [  OK  ]
   Unmounting HGFS shares:                                 [  OK  ]
   Guest filesystem driver:                                [  OK  ]


[EXPERIMENTAL] The VMware FileSystem Sync Driver (vmsync) is a new feature that
creates backups of virtual machines. Please refer to the VMware Knowledge Base
for more details on this capability. Do you wish to enable this feature?
[no]

Found a compatible pre-built module for vmci.  Installing it...


Found a compatible pre-built module for vsock.  Installing it...


Found a compatible pre-built module for vmxnet3.  Installing it...


Found a compatible pre-built module for pvscsi.  Installing it...


Found a compatible pre-built module for vmmemctl.  Installing it...


The VMware Host-Guest Filesystem allows for shared folders between the host OS
and the guest OS in a Fusion or Workstation virtual environment.  Do you wish
to enable this feature? [yes]

Found a compatible pre-built module for vmhgfs.  Installing it...


Found a compatible pre-built module for vmxnet.  Installing it...


Found a compatible pre-built module for vmblock.  Installing it...


!!! [EXPERIMENTAL] !!!
VMware automatic kernel modules enables automatic building and installation of
VMware kernel modules at boot they are not already present.  By selecting yes,
you will be enabling this experimental feature.  You can always disable this
feature by re-running vmware-config-tools.pl.

Would you like to enable VMware automatic kernel modules?
[no]

## 以下は、GUI関連の設定になります。

Detected X version 7.1


Host resolution detected as "1600 x 1200".


Please choose one of the following display sizes that X will start with:

[1]  "320x200"
[2]  "320x240"
[3]  "400x300"
[4]  "512x384"
[5]  "640x400"
[6]  "640x480"
[7]  "720x480"
[8]  "800x480"
[9]  "854x480"
[10]  "720x576"
[11]  "800x600"
[12]  "1024x768"
[13]  "1280x720"
[14]  "1280x768"
[15]  "1152x864"
[16]  "1280x800"
[17]  "1366x768"
[18]  "1280x960"
[19]  "1440x900"
[20]  "1280x1024"
[21]< "1400x1050"
Please enter a number between 1 and 21:

[21] 12


X is running fine with the new config file.

no record for 'sda' in database
/usr/bin/udevinfo: option requires an argument -- p
Usage: udevinfo [-anpqrVh]
  -q TYPE  query database for the specified value:
             'name'    name of device node
             'symlink' pointing to node
             'path'    sysfs device path
             'env'     the device related imported environment
             'all'     all values

  -p PATH  sysfs device path used for query or chain
  -n NAME  node/symlink name used for query

  -r       prepend to query result or print udev_root
  -a       print all SYSFS_attributes along the device chain
  -e       export the content of the udev database
  -V       print udev version
  -h       print this help text

Creating a new initrd boot image for the kernel.
Starting VMware Tools services in the virtual machine:
   Switching to guest configuration:                       [  OK  ]
   Paravirtual SCSI module:                                [  OK  ]
   Guest memory manager:                                   [  OK  ]
   Guest vmxnet fast network device:                       [  OK  ]
   VM communication interface:                             [  OK  ]
   VM communication interface socket family:               [  OK  ]
   Guest filesystem driver:                                [  OK  ]
   Mounting HGFS shares:                                   [  OK  ]
   Blocking file system:                                   [  OK  ]
   Guest operating system daemon:                          [  OK  ]
   Virtual Printing daemon:                                [  OK  ]
The configuration of VMware Tools 8.8.0 build-471268 for Linux for this running
kernel completed successfully.

You must restart your X session before any mouse or graphics changes take
effect.

You can now run VMware Tools by invoking "/usr/bin/vmware-toolbox-cmd" from the
command line or by invoking "/usr/bin/vmware-toolbox" from the command line
during an X server session.

To enable advanced X features (e.g., guest resolution fit, drag and drop, and
file and text copy/paste), you will need to do one (or more) of the following:
1. Manually start /usr/bin/vmware-user
2. Log out and log back into your desktop session; and,
3. Restart your X session.

To use the vmxnet driver, restart networking using the following commands:
/etc/init.d/network stop
rmmod pcnet32
rmmod vmxnet
modprobe vmxnet
/etc/init.d/network start

Enjoy,

--the VMware team

Found VMware Tools CDROM mounted at /mnt/cdrom. Ejecting device /dev/cdrom ...

[vmware-tools-distrib]$
上記の中のこの文字色は、タイプ(入力)した箇所になります。
上記の中のこの文字色は、確認事項になります。
確認事項については、ほとんどが括弧内に表示されているデフォルトのままでOKなので改行で、作業を進めます。 問題となるとしたら、画面の解像度ぐらいだと思います。ここでは、解像度”1024×768″を指定しています。自身の環境に合わせて各確認事項に応えていきましょう。
CentOS 6 Scientific Linux 6
[hoge]$ ls
VMwareTools-8.8.0-471268.tar.gz  vmware-tools-distrib
[hoge]$ cd vmware-tools-distrib/
[vmware-tools-distrib]$ ls
FILES  INSTALL  bin  doc  etc  installer  lib  vmware-install.pl
[vmware-tools-distrib]$ ./vmware-install.pl

Installing VMware Tools.

In which directory do you want to install the binary files?
[/usr/bin]

What is the directory that contains the init directories (rc0.d/ to rc6.d/)?
[/etc/rc.d]

What is the directory that contains the init scripts?
[/etc/rc.d/init.d]

In which directory do you want to install the daemon files?
[/usr/sbin]

In which directory do you want to install the library files?
[/usr/lib/vmware-tools]

In which directory do you want to install the documentation files?
[/usr/share/doc/vmware-tools]

The path "/usr/share/doc/vmware-tools" does not exist currently. This program
is going to create it, including needed parent directories. Is this what you
want? [yes]

The installation of VMware Tools 8.8.0 build-471268 for Linux completed
successfully. You can decide to remove this software from your system at any
time by invoking the following command: "/usr/bin/vmware-uninstall-tools.pl".

Before running VMware Tools for the first time, you need to configure it by
invoking the following command: "/usr/bin/vmware-config-tools.pl". Do you want
this program to invoke the command for you now? [yes]

Initializing...


Making sure services for VMware Tools are stopped.


[EXPERIMENTAL] The VMware FileSystem Sync Driver (vmsync) is a new feature that
creates backups of virtual machines. Please refer to the VMware Knowledge Base
for more details on this capability. Do you wish to enable this feature?
[no]

Found a compatible pre-built module for vmci.  Installing it...


Found a compatible pre-built module for vsock.  Installing it...


The module vmxnet3 has already been installed on this system by another
installer or package and will not be modified by this installer.  Use the flag
--clobber-kernel-modules=vmxnet3 to override.

The module pvscsi has already been installed on this system by another
installer or package and will not be modified by this installer.  Use the flag
--clobber-kernel-modules=pvscsi to override.

The module vmmemctl has already been installed on this system by another
installer or package and will not be modified by this installer.  Use the flag
--clobber-kernel-modules=vmmemctl to override.

The VMware Host-Guest Filesystem allows for shared folders between the host OS
and the guest OS in a Fusion or Workstation virtual environment.  Do you wish
to enable this feature? [yes]

Found a compatible pre-built module for vmhgfs.  Installing it...


Found a compatible pre-built module for vmxnet.  Installing it...


Found a compatible pre-built module for vmblock.  Installing it...


!!! [EXPERIMENTAL] !!!
VMware automatic kernel modules enables automatic building and installation of
VMware kernel modules at boot they are not already present.  By selecting yes,
you will be enabling this experimental feature.  You can always disable this
feature by re-running vmware-config-tools.pl.

Would you like to enable VMware automatic kernel modules?
[no]

No X install found.

Creating a new initrd boot image for the kernel.
vmware-tools start/running
The configuration of VMware Tools 8.8.0 build-471268 for Linux for this running
kernel completed successfully.

You must restart your X session before any mouse or graphics changes take
effect.

You can now run VMware Tools by invoking "/usr/bin/vmware-toolbox-cmd" from the
command line or by invoking "/usr/bin/vmware-toolbox" from the command line
during an X server session.

To enable advanced X features (e.g., guest resolution fit, drag and drop, and
file and text copy/paste), you will need to do one (or more) of the following:
1. Manually start /usr/bin/vmware-user
2. Log out and log back into your desktop session; and,
3. Restart your X session.

To use the vmxnet driver, restart networking using the following commands:
/etc/init.d/network stop
rmmod pcnet32
rmmod vmxnet
modprobe vmxnet
/etc/init.d/network start

Enjoy,

--the VMware team

[vmware-tools-distrib]$
上記の中のこの文字色は、タイプ(入力)した箇所になります。
上記の中のこの文字色は、確認事項になります。
確認事項については、ほとんどが括弧内に表示されているデフォルトのままでOKなので改行で、作業を進めます。
- 再起動します。
$ reboot
- 立ち上がったら、VMwareToolsを起動します。
CentOS 5
$ /etc/init.d/vmware-tools start
$ /etc/init.d/vmware-tools status
vmtoolsd is running
$ chkconfig vmware-tools on
$ chkconfig --list vmware-tools
vmware-tools    0:off   1:off   2:on    3:on    4:on    5:on    6:off
$
ここの最後に設定しているように、chkconfigで必ず再起動でも自動的にサービス開始となるように設定します。
CentOS 6 Scientifix Linux 6
$ start vmware-tools
$ status vmware-tools
vmtoolsd is running
$
CentOS 6 / Scientifix Linux 6 では、通常のデーモンでなく Upstart が使われてます。
そのため、start / stop / status コマンドを用いて制御します。
rebootするとデフォルトで起動しますから、先のrebootを実行した際は、上記のstartコマンドは不要のはずです。
また、chkconfigも必要ありません。どうしても再起動などで自動で起動したくない場合は、以下のファイル( /etc/init/vmware-tools.conf )を編集します。上記のように start on runlevel …. 部分をコメントアウトすれば自動起動しないでしょう。########################################################################## # Copyright 2010 VMware, Inc. All rights reserved. -- VMware Confidential ########################################################################## ########################################################################## # DO NOT modify this file directly as it will be overwritten the next # time the VMware Tools are installed. ########################################################################## description "VMware Tools services" author "VMware, Inc." # Be sure to block the display managers until our job has completed. This # is to make sure our kernel services are running before vmware-user # may launch. # start on... をコメントアウトします。 # start on runlevel [235] or starting gdm or starting kdm or starting prefdm stop on runlevel [06] pre-start exec /etc/vmware-tools/services.sh start post-stop exec /etc/vmware-tools/services.sh stop
Upstartとは、
今まで、Linuxのシステム初期化に利用されていた sysvinit にかわる新しい「init」プログラムです。
つまり、ちょっと語弊がありますが、ブート時のタスクの起動、シャットダウン時のタスクの停止などでサービスを管理する新しいプログラムになります。
具体的にサービスの起動方法は、今まで、
/etc/init.d/vmware-tools start
と起動していたものが、
start vmware-tools
のようになります。
- VMwareToolsが正しく動作しているか確認します。
VMware Player のメニューから、[ 仮想マシン ] – [ 仮想マシンの設定 ] を選択します。

VMware Player の仮想マシン設定画面が表示されます。[ オプション ] タブを選択します。
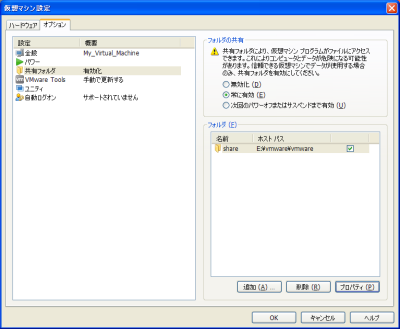
画面左から[ 共有フォルダ ] を選択し、画面右上、[ 常に有効 ]を選択し、[ OK ] ボタンをクリックすることで共有フォルダが見えるようになります。
まだ、共有フォルダが何も設定されていない場合は、右下[ 追加 ]ボタンをクリックして共有フォルダを追加しましょう。
ここでの説明は、VMware Player 4.0 にて行っています。そのため、メニュー項目や画面イメージが異なることがあります。$ cd /mnt/hgfs [hgfs]$ ls
 share
[hgfs]$ cd share
 [share]$ ls
 test.txt
必ず、共有フォルダは、/mnt/hgfsの配下に見えます。
上の例では、共有フォルダ名: share の場合、
/mnt/hgfs/share が共有フォルダとなり、その配下には、test.txt というファイルが見えている・・・ということです。
Windowsに比べると面倒ですね。
でも、これが使えると色々試したいときに、共有フォルダが使えるようになりますから、かなり便利ですね。
共有フォルダだけなら、Sambaなどでも代用できますから、Sambaを設定してしまえば良いことなんですけどね。 その他にも、いろいろと恩恵があるので、VMware Player使うならVMwareToolsは設定しておいて損はありません。 お試しあれ。
このサイトでは、コンテンツの一部が非表示、あるいは、コメント、お問い合わせの投稿ができない、検索ができないことがあります。

 )
)




コメントを投稿 :